
Spring Security không chỉ hỗ trợ bảo mật web app thông qua login form bằng username & password mà còn hỗ trợ cơ chế Basic Authentication. Chúng ta sẽ dùng cơ chế này để làm bảo mật cho các Rest API của Spring Boot
1. Giới thiệu
Trong bài hướng dẫn hôm trước The Code Root đã giới thiệu đến các bạn bài hướng dẫn tích hợp Spring Security vào ứng dụng Spring boot, xử lý Authentication bằng Login Form. Các bạn có thể tìm đọc lại ở đây
Bài hướng dẫn hôm nay sẽ hướng dẫn các bạn dùng Spring Security để xử lý Basic Authentication bảo mật các Rest API.
2. Hướng dẫn code.
Chuẩn bị Tools:
- JDK 8 trở lên.
- IDE tuỳ chọn
- Maven 3.6
- Spring Boot 2.1.5.RELEASE
- MySQL Workbench
- XAMPP
- Tạo sẵn 1 database với tên "testspringsecurity" .
Database - Insert data cho User:
insert into testspringsecurity.test_user(id,email,password,phone,role_name)
values (1,'minhnhatict@gmail.com','$2a$10$EblZqNptyYvcLm/VwDCVAuBjzZOI7khzdyGPBr08PpIi0na624b8.', '31312343','ROLE_ADMIN');

insert into testspringsecurity.test_user(id,email,password,phone,role_name)
values (2,'minhnhatict_user@gmail.com','$2a$10$EblZqNptyYvcLm/VwDCVAuBjzZOI7khzdyGPBr08PpIi0na624b8.', '31312343','ROLE_ADMIN');
Tương tự như bài trước, chúng ta vẫn cần 2 User để test ứng dụng. Có thể bỏ qua bước này nếu bạn đã thực hiện ở bài hướng dẫn trước.
Thư viện Maven
Chúng ta vẫn dùng Spring Security nên thư viện Maven không khác biệt so với trước:
<?xml version="1.0" encoding="UTF-8"?>
<project xmlns="https://maven.apache.org/POM/4.0.0"
         xmlns:xsi="https://www.w3.org/2001/XMLSchema-instance"
         xsi:schemaLocation="https://maven.apache.org/POM/4.0.0
	https://maven.apache.org/xsd/maven-4.0.0.xsd">
    <modelVersion>4.0.0</modelVersion>

    <artifactId>spring-boot-web-spring-security</artifactId>
    <packaging>jar</packaging>
    <version>1.0</version>

    <parent>
        <groupId>org.springframework.boot</groupId>
        <artifactId>spring-boot-starter-parent</artifactId>
        <version>2.1.5.RELEASE</version>
    </parent>

    <properties>
        <java.version>1.8</java.version>
    </properties>

    <dependencies>
        <!-- Spring Boot -->
        <dependency>
            <groupId>org.springframework.boot</groupId>
            <artifactId>spring-boot-starter-web</artifactId>
        </dependency>

        <!-- Spring Security -->
        <dependency>
            <groupId>org.springframework.boot</groupId>
            <artifactId>spring-boot-starter-security</artifactId>
        </dependency>

        <!-- thymeleaf? -->
        <dependency>
            <groupId>org.springframework.boot</groupId>
            <artifactId>spring-boot-starter-thymeleaf</artifactId>
        </dependency>

        <!-- userful tags for thymeleaf to integrate with spring security -->
        <dependency>
            <groupId>org.thymeleaf.extras</groupId>
            <artifactId>thymeleaf-extras-springsecurity5</artifactId>
        </dependency>

        <dependency>
            <groupId>org.springframework.security</groupId>
            <artifactId>spring-security-data</artifactId>
        </dependency>

        <!--spring data-->
        <dependency>
            <groupId>org.springframework.boot</groupId>
            <artifactId>spring-boot-starter-data-jpa</artifactId>
        </dependency>

        <dependency>
            <groupId>mysql</groupId>
            <artifactId>mysql-connector-java</artifactId>
            <version>8.0.13</version>
        </dependency>

        <!-- enable live reload -->
        <dependency>
            <groupId>org.springframework.boot</groupId>
            <artifactId>spring-boot-devtools</artifactId>
            <optional>true</optional>
        </dependency>

        <!-- for bootstrap -->
        <dependency>
            <groupId>org.webjars</groupId>
            <artifactId>bootstrap</artifactId>
            <version>3.3.7</version>
        </dependency>

        <!--lombok-->
        <dependency>
            <groupId>org.projectlombok</groupId>
            <artifactId>lombok</artifactId>
            <version>1.16.8</version>
            <scope>provided</scope>
        </dependency>

    </dependencies>
    <build>
        <plugins>
            <!-- Package as an executable jar/war -->
            <plugin>
                <groupId>org.springframework.boot</groupId>
                <artifactId>spring-boot-maven-plugin</artifactId>
            </plugin>
        </plugins>
    </build>
</project>
Tiếp theo là khai báo cho các class Entity User và UserRepository:
Entity User
@Entity
public class User {

    @Id
    @GeneratedValue(strategy = GenerationType.AUTO)
    private Long id;

    @Column(nullable = false, unique = true)
    @Email
    private String email;

    private String password;

    private String phone;

    private String roleName;

    //standard getters and setters
}
UserRepository
import org.springframework.data.jpa.repository.JpaRepository;

public interface UserRepository extends JpaRepository<User, Long> {

    public User findByEmail(String email);

}
Controller
package thecoderoot.springsecurity.restapi.controller;

import org.springframework.web.bind.annotation.GetMapping;
import org.springframework.web.bind.annotation.RestController;

@RestController
public class UserController {

    @GetMapping(value = "/user")
    public String userApi(){
        return "Returned successfully from User API";
    }

    @GetMapping(value = "/admin")
    public String adminApi(){
        return "Returned successfully from Admin API";
    }
}
Chúng ta sẽ khai báo 2 API đơn giản dành cho người dùng có Role User và người dùng có Role Admin.
Cũng tương tự như bài hướng dẫn trước, nếu chúng ta muốn phân cấp cho Role Admin cao hơn Role User và có quyền truy cập vào các trang của Role User, thì chúng ta sẽ khai báo RoleHierarchy
@Bean
    public RoleHierarchy roleHierarchy() {
        RoleHierarchyImpl r = new RoleHierarchyImpl();
        r.setHierarchy("ROLE_ADMIN >  ROLE_USER");
        return r;
    }
Và hiển nhiên để sử dụng được Spring Security chúng ta phải cần 1 class SpringSecurityConfig extends class WebSecurityConfigurerAdapter để có thể sử dụng các chức năng:
SpringSecurityConfig
package thecoderoot.springsecurity.restapi.config;

import org.springframework.beans.factory.annotation.Autowired;
import org.springframework.context.annotation.Bean;
import org.springframework.context.annotation.Configuration;
import org.springframework.security.access.hierarchicalroles.RoleHierarchy;
import org.springframework.security.access.hierarchicalroles.RoleHierarchyImpl;
import org.springframework.security.config.annotation.authentication.builders.AuthenticationManagerBuilder;
import org.springframework.security.config.annotation.method.configuration.EnableGlobalMethodSecurity;
import org.springframework.security.config.annotation.web.builders.HttpSecurity;
import org.springframework.security.config.annotation.web.builders.WebSecurity;
import org.springframework.security.config.annotation.web.configuration.WebSecurityConfigurerAdapter;
import org.springframework.security.web.firewall.HttpFirewall;
import org.springframework.security.web.firewall.StrictHttpFirewall;

@Configuration
@EnableGlobalMethodSecurity(prePostEnabled = true)
public class SpringSecurityConfig extends WebSecurityConfigurerAdapter {

    @Autowired
    private CustomBasicAuthenticationEntryPoint authenticationEntryPoint;

    @Autowired
    private CustomAuthenticationProvider authProvider;

    @Override
    protected void configure(HttpSecurity http) throws Exception {
        http.csrf().disable()
                .authorizeRequests()
                .antMatchers("/").permitAll()
                .antMatchers("/user").hasAnyRole("USER")
                .anyRequest().authenticated()
                .and()
                .httpBasic()
                .authenticationEntryPoint(authenticationEntryPoint);
    }

    @Override
    protected void configure(AuthenticationManagerBuilder auth) throws Exception {
        auth.authenticationProvider(authProvider);
    }

    @Bean
    public RoleHierarchy roleHierarchy() {
        RoleHierarchyImpl r = new RoleHierarchyImpl();
        r.setHierarchy("ROLE_ADMIN >  ROLE_USER");
        return r;
    }

    @Override
    public void configure(WebSecurity web) throws Exception {
        //@formatter:off
        web.httpFirewall(allowUrlEncodedSlashHttpFirewall());
    }
}
Một điều khác biệt với bài hướng dẫn trước về Spring Security Login Form là trong ví dụ này chúng ta sẽ sử dụng custom AuthenticationProvider, nghĩa là chúng ta sẽ tự implement logic kiểm tra username và password. Trong class này chúng ta sẽ tìm kiếm User bằng email do người dùng nhập, bằng method của class UserRepository:
public User findUserByEmail(String email);
Các bạn lưu ý rằng, password của người dùng phải luôn được lưu trữ mã hóa và không bao giờ được ở dạng clean text và kể cả khi tiến hành so sánh với password do người dùng nhập vào, chúng ta vẫn phải so sánh chúng ở dạng mã hoá. Trong bài hướng dẫn này, chúng ta sẽ deligate việc này cho thư viện Bcrypt bằng cách sử dụng method :
new BCryptPasswordEncoder().matches(password, comparePassword);
Khi password của người dùng hợp lệ hay nói cách khác là method matches() của BCrypt trả về true, chúng ta cần return 1 object UsernamePasswordAuthenticationToken, với các giá trị sau: email, password và list các Role của User - trong bài hướng dẫn này người viết chỉ giới hạn 1 Role cho 1 User.
Sau khi login thành công các dữ liệu người dùng sẽ được quản lý bới Spring Security.
CustomAuthenticationProvider
package thecoderoot.springsecurity.restapi.config;

import thecoderoot.springsecurity.restapi.model.User;
import thecoderoot.springsecurity.restapi.model.UserRepository;
import org.springframework.beans.factory.annotation.Autowired;
import org.springframework.security.authentication.AuthenticationProvider;
import org.springframework.security.authentication.UsernamePasswordAuthenticationToken;
import org.springframework.security.core.Authentication;
import org.springframework.security.core.AuthenticationException;
import org.springframework.security.core.authority.SimpleGrantedAuthority;
import org.springframework.security.crypto.bcrypt.BCryptPasswordEncoder;
import org.springframework.stereotype.Service;

import java.util.Arrays;

@Service
public class CustomAuthenticationProvider implements AuthenticationProvider {
    @Autowired
    private UserRepository userRepository;

    @Override
    public Authentication authenticate(Authentication authentication) throws AuthenticationException {
        String email = authentication.getName();
        String password = authentication.getCredentials().toString();

        User user = userRepository.findUserByEmail(email);
        if (user != null) {
            BCryptPasswordEncoder passwordEncoder = new BCryptPasswordEncoder();
            String comparePassword = user.getPassword();
            if (passwordEncoder.matches(password, comparePassword)){
                return new UsernamePasswordAuthenticationToken(email, password,
                        Arrays.asList(new SimpleGrantedAuthority(user.getRoleName())));
            }
        }
        return null;
    }

    @Override
    public boolean supports(Class<?> auth) {
        return auth.equals(UsernamePasswordAuthenticationToken.class);
    }
}
Main
package thecoderoot.springsecurity.restapi;

import org.springframework.boot.SpringApplication;
import org.springframework.boot.autoconfigure.SpringBootApplication;

@SpringBootApplication(scanBasePackages = "thecoderoot.springsecurity.restapi")
public class Main {

    public static void main(String[] args) {
        SpringApplication.run(Main.class, args);
    }
}
3. Testing
Chúng ta sẽ sử dụng Postman để test ứng dụng này, vì trình duyệt không hỗ trợ cho chúng ta embed được Header Authorization vào trong Request.
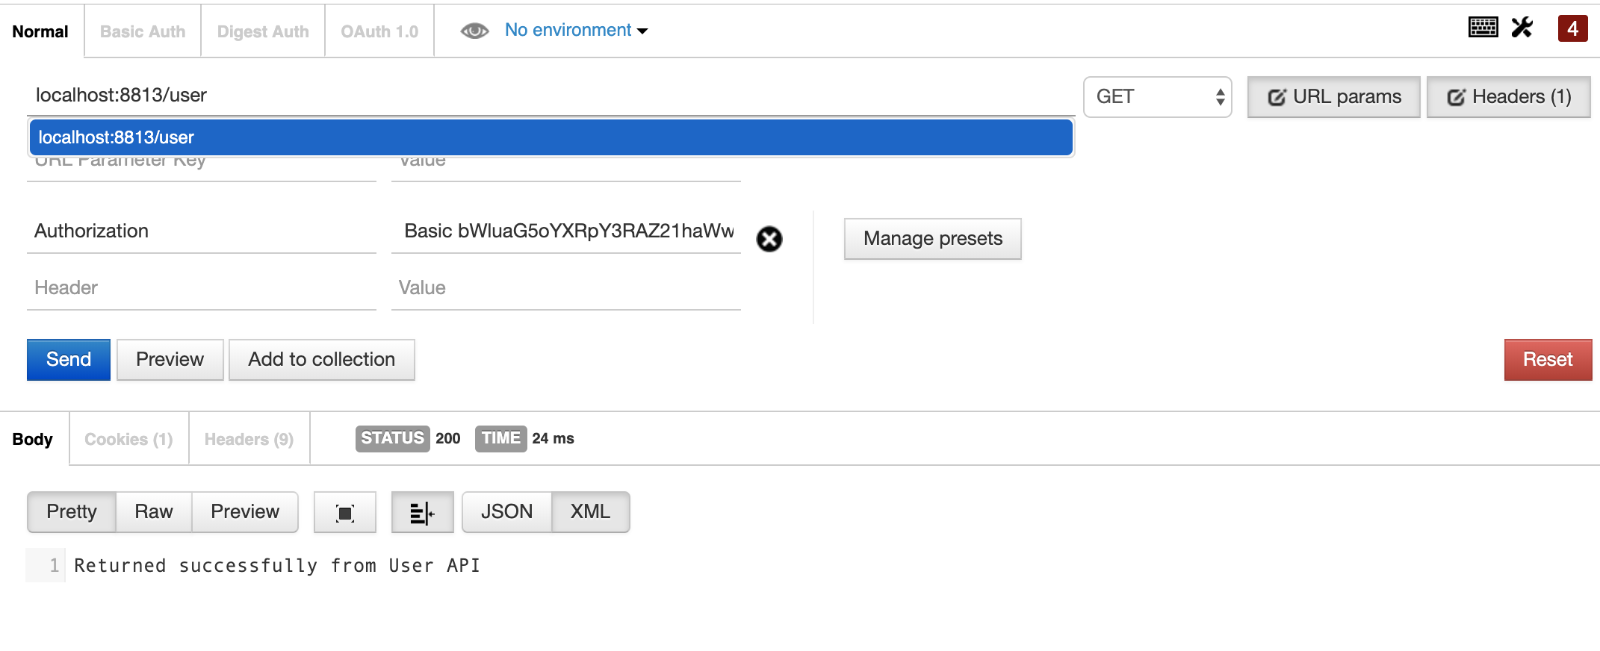
Header Authorization "Basic bWluaG5oYXRpY3RAZ21haWwuY29tOjEyMzQ1Ng=="
Để thực hiện test login vào ứng dụng, các bạn cần chuẩn bị chuỗi authent như trên. Chuỗi trên chính là username và password được mã hoá bằng Base64 gửi đến User bằng Header Authorization. Như ví dụ của chúng ta là chuỗi "minhnhatict@gmail.com:123456".
Cú pháp: <username:password> --> encode Base64. Tiếp theo cộng thêm text "Basic " phía trước chuỗi mã hoá. Cuối cùng chúng ta có được chuỗi như trên: "Basic bWluaG5oYXRpY3RAZ21haWwuY29tOjEyMzQ1Ng==".
Và sau cùng chúng ta tiến hành testing.
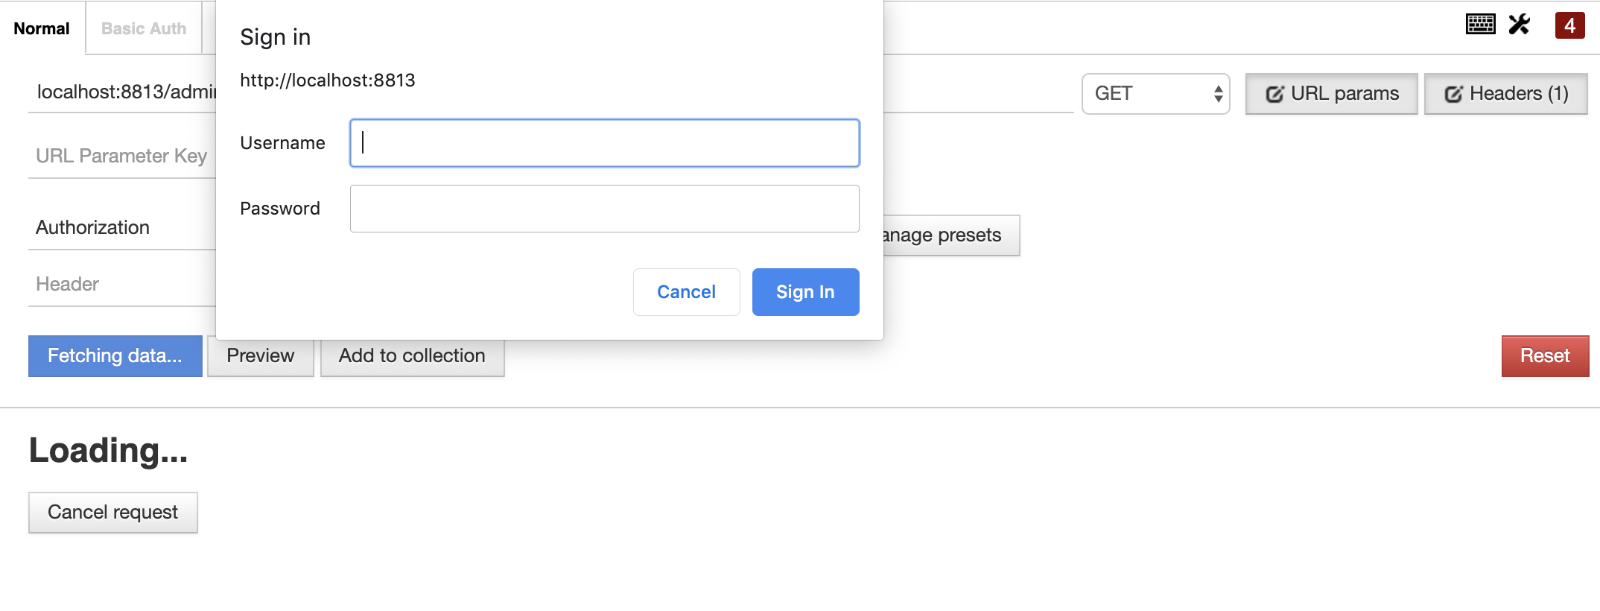
Test case 1: truy cập api /user không có Header Authorization hoặc sai username/password.
Test case 2: truy cập api /user với username/password được set đúng:
Các bạn có thể thực hiện tương tự testing với api /admin.
Các bạn download source code tại đây
Chúc các bạn thành công.
AutoCode.VN